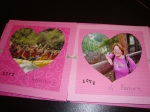
 There is a buzz of excitement around our house these days-and I must say it has had me distracted to no end-thus no posts for the last few days. Finally, today, I feel like I’ve managed to recover sufficiently and rescue my brain before it backed out of the driveway along with my former life. Promise to post next week with a full explanation, but for now I wanted to share a last minute V-day idea I came up with to send to my mom. She loves pictures of her family and says she reads and re-reads cards she receives. She always has a little display of cards people have sent her from the most recent holiday/event.
I saw an idea for something like this in a magazine a year or two ago and have wanted to make it since. I didn’t have the directions so I improvised. It’s great because it’s very portable and reads like a card but would be easy to hang for display. You could improvise the photos for drawings your kids made or with a list of things you love about the recipient-maybe you could hang it over a child’s bed for a few days? The directions follow-hope you like! If you’re looking for some other great crafty ideas then check out this idea from How does She…-so creative! Can’t wait to make one of my own! Also love this idea from Pretty Partridge. You could give as a gift but also looks nice just as a decoration in a pretty bowl-maybe you could write sweet or inspirational sayings on them for a little v-day pick me up.
Supplies I used:
- (10) 6” x6” pieces of pretty paper
- (7) 5”x 5” pieces of complementary paper to be used as backgrounds for heart-shaped photos
- (7) photos cut into a Heart Shape
- Approximately 3 feet of ribbon/string of Choice
- Letter Stamps/Ink Pad or Writing utensil of choice
- Glue Stick
- Hole Punch
- Ruler
- Scissors/Paper Cutter
To Make:
- Grab the pictures you want to use. Create a heart-shaped template (or use a box of chocolates-yum!) and trace the shape on the pictures you’re going to use. Cut out the pictures.
- Pick your coordinating paper. I used three different patterns but two or even four would look great I think. Cut the background paper into 6” square pieces. Then cut the photo border paper into 5” square pieces. If you want a place to write a message or title for your card then make sure to cut extra 6” squares. You can use leftover scraps to make title strips.
- Glue the photos on the 5” squares and then glue these on the 6” squares.
- Measure 3” down on each side of each 6” square. Mark with a pencil, then punch holes over marks. Now you’ve got your place to thread your ribbon.
- Lay your 6” squares in the order you want them to be read and go ahead and write/stamp your message/card title.
- Thread your ribbon from front to back (as seen in the photo). You want a line of ribbon running behind each 6” square. Be sure to leave a few inches of extra length ribbon on each end for tying the card and then later as a way to hang the banner. Don’t tie the ribbon off, leave it loose.
- Fold the top card face down, then flip the folded piece to the left, now right and then left to create an accordion type of card. Now you can tighten up the ribbon just enough to get rid of any slack in the middle.
- Tie your ribbon pieces together in a pretty bow. Wah-lah! You’ve got yourself a quick& easy personal card and festive banner in one.


02/10/2010 at 9:57 am
How neat! Your mom will love it. Good job!!
02/11/2010 at 12:19 pm
Thanks-it was fun putting it together (=
Pingback: uberVU - social comments
02/16/2010 at 2:20 pm
Rachel,
I keep checking back to see what the “buzz of excitement around our house these days” that you mention in this post is all about!?!?!?
02/16/2010 at 6:49 pm
Explanation forthcoming-promise!
02/23/2010 at 3:04 pm
To start, allow me to point out that your internet site is fantastic. I love the theme that you have. It was very easy on the eyes. Appreciate your article too. Definitely subscribed to your feed to make sure I won’t be missing out on any updates. Excellent job! Toast to a productive business
02/24/2010 at 10:28 pm
Thank you!!!